How to do a Ping Back.


What does a Ping Back mean?

For our purposes a Ping is when one website speaks to another website.

How does that conversation take place?

You take the URL from one Blog Post and place within the content of the Blog Post of the other website and make sure it is active/live/working.

What ways can you do a Ping Back?

  1. Make the actual URL active within the post.
  2. Place the URL within a word of a sentence of the content of the post.
  3. Place the URL within an Image of the post.

WordPress Ping Backs Image

Numbers 1 and 2 are done the same way.

  1. You highlight whatever it is that you want the reader to click on in order to go to the other post.
  2. You then click on the Insert/edit link Icon.
  3. You place the URL within the Paste URL or type to search field of the pop up box.
  4. You then click the blue box with the white arrow within it.
  5. You are done.
  6. Extra-If you want your link to open in new tab click the Gear next to the blue box with the white arrow and check the box that says Open link in new tab then click Add Link. (Why do this? You don’t really want people to leave your site. So if the link opens in a new tab, they still have your site up and you have a good chance of the reader checking out other things on your site.)

For an Image.

You click the image and then repeat steps 2-5 above.

Why do a Ping Back in the first place?

The Ping Back will appear in the comments of the Post of the other site, letting the owner as well as any other readers aware that you have participated or made some type of comment regarding the post. This will encourage Traffic to your blog.

I ask for people to do a Ping Back in the various challenges I host on my blog. Some blogs receive hundreds of extra visits each year because of doing Ping Backs.

There are URLs that won’t send a real Ping Back to the original Blog.

If you were to use the URL of my Blog’s Home Page or the Category Page of one of my challenges, the reader of your post would be able to click the link and visit me, but I would not receive a Ping Back. If you think about it, it makes sense. There isn’t a comments section on a Category Page nor a normal Home Page.

Much Respect

Ronovan

© Copyright-All rights reserved by ronovanwrites.wordpress.com 2016

Advertisement

Blog Tour – AMBER WAKE: Featured Post – How to Create a Man for Romance

Here’s a guest post I did on a blog that leans toward enjoying the romantical. Make sure you check it out. Vanessa asked me to provide a post and I read her blog to see what might be of interest, just as I mentioned you should do in another guest post on my blog tour. I thought how I went about, and the thought process behind, the creation of Captain Gabriel Wallace would make a good guest post.

How to be a Great Guest Blogger by author @RonovanWrites!

Visit my guest post on Hugh’s blog. Some great advice in the comments as well. Seriously.

MAKE YOUR FONTS VISIBLE ON IMAGES.

You have a great piece of writing and a great photo to put it on. You put the words on the image and what happens? You can’t seem to find that happy color of font to show all of your words because a normal photo has a great number of colors in it. Even if your photo is the sky, you have shades of blue ranging from so pale a blue it looks white down to the dark blues to almost dusk. The answer? Overlay images.

A Note: All overlay images were found in the public domain. The actual photo of the building is mine.

Make Your Fonts Visible

One thing to know, this post is not that long, it’s mostly taken up with image examples.

How do you make it work and still see your image? You know you could put a block of color in the sky and put your text in. But that ruins what you’re going for.

Enter picmonkey.com.

I use picmonkey quite often in tandom with pixlr.com, a free photoshop like product online.

Below is a photo from the top of a parking deck on the campus of UGA. You can see the stadium lights to Sanford Stadium over the buildings in the distance. As you can see, my name doesn’t show very well across the building but very well in the sky.

UGA by Ronovan Hester

Below you see the menu inside of picmonkey.com after you have loaded your image. The thing to know first is to create the overlay image/shape you want to use and then type your text. You can then manipulate all you like and the text will be to the forefront. Of course you can always do it the other way around as sort of a see through a veil or curtain affect.

A-Points to the Overlay Icon in the shape of a butterfly. The overlay does exactly as it sounds, it overlays something on top of the image already showing. You can even pull in your own image to overlay on top of the image you first loaded.

B- For the purpose of what I want to do with this image and text I’ll chose the Geometric options.

UGA Picmonkey Overlay Demo

C-I am choosing the rectangular Geometric option because it actually can be manipulated to any height or width. The square, for example, will obviously adjust to remain a square.

UGA Picmonkey Geometric Demo

D-You are able to make the image height taller or shorter by placing your cursor on the point along the edge and dragging the edge down.

E-You are able to increase or decrease the width by doing the same as the above but along the side edges.

F-By placing your cursor over the small circle over the top of the box and then clicking and holding down your mouse you are then able to rotate or tilt the box however you like. Something to keep in mind is making the text and box lines parallel.

UGA Picmonkey Geometric Manipulaiton Demo

G-Here you see the Editing Box for the Geometric Overlay rectangle I used.

H-There are two boxes, one for the outline of the rectangle, and then below it is the inside of the box, the part we’re concerned with today. The box will start out as black, but you can click on the box signified by “H” here and choose a color. You may first want to use the part signified by the “I” first.

I-To make the box fade to transparent you increase the Fade. I left the color as black here and you can see the letters are still more visible as a whole than before.

J-You are able to do some different Overlay manipulation other than simple fading of a selected color by choosing the Blend Modes option. Simply select the different options within and see what they do. Some are very surprising.

UGA Picmonkey Demo

Below you see the final result with the box having been changed to the dark green of the trees in the background to the right of the building. I chose this color by clicking on the black box image, signified by the letter “H” above and choosing the eyedropper. I then clicked on the tree. I could have also let my cursor go over all the colors inside of that letter “H” box and the Faded Geometric rectangle would have changed colors as the cursor passed over each color.

UGA Faded Ronovan Hester Green Demo

And last we have the copyright in the sky with a red background of a box with the same blue lettering as above. Skies are difficult to have attractive lettering in and this will help you accomplish that. Something to consider with what I did here. I moved the box and text up and then tilted everything back to horizontal. Easy? Maybe for some, but what I did, to make certain the text and the box were in line with each other was drag them both to the bottom and line them up with the bottom edge of the screen. Then I moved them to the top.

UGA Ronovan Hester Sky Demo

You may pull in your own images as overlays by choosing the Your Own at the top of the Overlay options. Following are two examples. One is the UGA G, the image was found in the public domain. The photo is mine. It is followed by the same image with a curtain, found in the public domain, overlay over it.

UGA Image Ronovan Hester G

UGA G and Curtain Ronovan Hester

You may have a lot of fun with this feature. I did have to make the G and the Curtain fit the building image. To do that all I had did was take the corner of the image and drag it to increase the size. Try it, you’ll see how easy it is. The other Overlay image options do the same thing as the Geometric and Your Own.

When you save the image, remember to rename it to something other than the original name of the image. That way you keep your original image in its original form.

You are also able to use these techniques when creating book covers.

Enjoy!


Ronovan Hester is an author, with the debut novel Amber Wake: Gabriel Falling due out in December. He shares his life as an amnesiac and Chronic Pain sufferer through his blog RonovanWrites.WordPress.com with the hope if inspiring others to overcome and continue on. His love of poetry, authors and community through his online world has lead to a growing Weekly Haiku Challenge and the creation of a site dedicated to book reviews, interviews and author resources known as LitWorldInterviews.WordPress.com.

Enter your email address to subscribe to this blog and receive notifications of new posts by email.

@RonovanWrites

 © Copyright-All rights reserved by ronovanwrites.wordpress.com 2015

Plan for Success!

Did you read my 10 Tips to Make Blogging Enjoyable. Traps to Avoid? If not, it’s still there…waiting. Why do I mention it, other than hoping those of you that missed it go and read it? There is actually an 11th Tip. Unfortunately I didn’t think of it in the 11th hour, I thought of it after that. But that just means I get to write another Blogging Tip article.

Plan, Organize, Organize, oh and Organize!

We think we organize, but we don’t. We have some categories we click the little box next to for each post but we begin to write things and come up with random categories. Before we know it we have countless categories or we have posts in an existing handful that don’t make sense.

Organizing from the very beginning of blogging makes for a lot of great benefits.

  • Easier Reader Navigation
  • Better Reader Enjoyment
  • Easier SEO Results
  • Less Headache and Mess for You, The Blogger

This isn’t my first go around with an article about organization. My 3 Best Blogging Tips for a Successful Blog  was one year ago discussing menu structures, how to do drop down menus and create real PAGES and fake ‘pages’ as headings for drop down menu sections. Yep, step-by-step.

Now, if you’re new, the Category is basically like a folder you place a post in and you can then actually make a page in your menu using that category. You can look at my menu around my header image to see what I am talking about.

Mine looks simple, right? In reality, mine is a mess. I have over 1300 articles now, posts, poems, tips, videos, and whatever other random things I’ve come up with. I tell you that so you know when I talk about a need to organize I know from experience.

The problem? The mess?

I realized too late my system for organizing was not adequate. Why? There was no system. For someone who spent years organizing and mapping out things for Plan Your Blog for Successlocations around the country, I can’t stand the condition things are in. But the process of correcting all the mess is overwhelming. I’ll do it, slowly, but slowly is the key word.

If you are a veteran blogger, take a handful of minutes a day and do a page of your content in the Dashboard each day. No more than that. If you do more, you get tired of it, disgusted, and it becomes work. Blogging should be an enjoyable part of our lives, even if we do it as a job.

Now, I have great articles, and I’m not tying to be all boastful. People have truly enjoyed some of my work, but people can’t find those articles. I can’t sometimes unless I go into my Dashboard. (Sorry, Dashboard is blog-speak for where all of our tools and useful things are.)

So organization leads to easy Reader Site Navigation.

To organize your content you need to:

  • Look at what the post you’re doing is at its general level. Is it a Tip, a Writing Piece, Music. What is it? Now you have your Headings/Page Names.
  • What is the post specifically about? Is it a Love Poem, a SciFi story, or a Blogging Tip? Now you have your Categories.
  • Now, for Tags, you go into all the wide and varied things people might think of when looking at the post; Poem, Romance, Desire, Paris, Ocean. I only mention Tags because we are talking about naming of things. This has nothing to do with organization so much, but does in a way when people do a search of a word or you use a Tag Cloud. (For WordPress, don’t use more than 13 Tags or your post might not show up in the WordPress Reader.)

There are countless tips out there about how to organize and boost traffic by managing your content. Not long ago I met Janice Wald of MostlyBlogging.com. The topic of blogging seems to be something she is passionate about and seeks out things to know. As I wrote the article I thought it would be great to ask her for some articles she thought might be of use about the subject of blog organization. Here are some related articles from her site you MUST READ:

The first thing you need to read is; How to Build the Perfect Blog Even if You Don’t Know How This will give you a basic checklist to go through to make sure you have prepared a post worth posting and being read. What you post is your reputation, image, brand. You want to get it right from the beginning. Some readers will never come back if you are bad from the beginning.

Perhaps you are wanting to know if you are doing things right. You think you are but how do you find out? Well, teacher Janice has a report card for you to go by. How to Grade Your Blog  (By the way, I got an A.)

What is another form of organization? How do you know for sure you are doing a good job of it? The report card above won’t tell you if you are getting the results from your efforts. And really there are some less technical aspects that you need to look at. How to Get Loyal Visitors to Repeatedly Return to Your Blog Here you will find a real success  story from a real success blogger.

Now, one final thing from Janice I like is, How to Increase Blog Traffic with Content Curation. It’s not about organizing but how to get more out of those old posts you wrote that no one sees these days. No amount of organization will get all of your work seen. But if you know how to spread that content around, you can get results, maybe even better ones at times.

But not all success of a blog has to do with organization or spreading the word. I for one can vouch for that on some level. Sometimes a blog achieves success not by organization but by personality. My friend Hugh Roberts of Hugh’s Views & News focuses more on the personality and feel of blogging, a blog, and the blog life to be successful. Yes he does the organization but he likes to provide tips on a personal level. One popular article to check out  is, Is Your Blog As Friendly As You Think It Is? It is one of his most recent but high on his most popular post list.

From me you can check my Most Popular list at the bottom of the blog, currently. There are two that seem to get attention the most over time, How to Survive the Blog Life. and Blogging Personality: The Key to Success.

BONUS TIP!

While I was writing the above and reading old articles of mine another tip came to mind.

Leave Your Post to Marinate

We write a post and want it out NOW. Big problem with that is the ugly word TYPO. Nothing worse than doing a Writing Tip article and you have typos everywhere.

Let your article sit a few days, a week or more if you can. Then you come back and read it and you see the problems, and read it in the Preview window, like it would be on your blog, NOT in the Post Editor. Post Editor windows allow for easy skipping over words and even sentences. Our eyes are more accustomed to truly reading something on a Blog page as opposed to the Editor page.

(All images created by Ronovan unless otherwise noted.)

REBLOG, TWEET, FB it, or GOOGLE+ it. Share it however you like so all those linked get clicked.

Much Respect-Much Love

Ronovan


Ron_LWIRonovan is an author, and blogger who shares his life as an amnesiac and Chronic Pain sufferer though his blog RonovanWrites.WordPress.com. His love of poetry, authors and community through his online world has lead to a growing Weekly Haiku Challenge and the creation of a site dedicated to book reviews, interviews and author resources known as LitWorldInterviews.WordPress.com.

Enter your email address to subscribe to this blog and receive notifications of new posts by email.

@RonovanWrites

 © Copyright-All rights reserved by ronovanwrites.wordpress.com 2015

How To: Do Page Jumps-Return to Top of Page. Updated to make it Simpler.


I’ve been doing something called Page Jumps on my articles lately and I’ve had requests how to do them. So here I am. Page Jumps are when you do things like click on something that says Return to Top and it takes you to the top of the article.

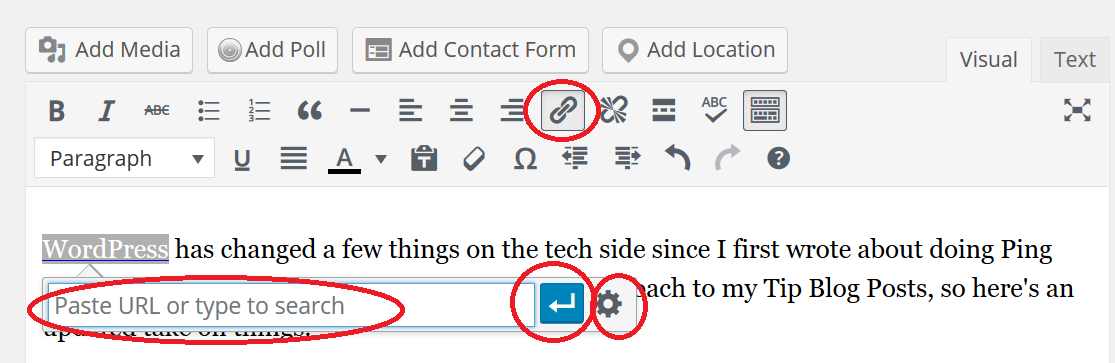
Here are the Codes to use to have your Readers Return to the Top of page by clicking on those words. Make certain to do this in your Text Tab of your Post Editor.
AND where you see quotation marks that look backwards? They should face the words. They appear backwards here due to the color fonts. I know it sounds crazy but apparently the quotation marks are prioritizing the font stuff over the text stuff. Go figure.

Anchor Code-It goes at the very top of your article.
<a id=”Top“></a>
Go To/Return to Top Code-It goes where you want the Reader to be able to click.
<a href=”#Top“>Return to Top</a>

Don’t worry about the colors. That’s just something I have from later in the post where the red is what you leave alone, and the blue is what you can change. The Reader won’t see the colors. Just the words Return to Top in that second code.

That’s the simple way without any explanation of how things work. You can do it and things are fine. If you want to understand more, keep reading. You can bail out of here any time you like.


If you’re still with me, I’ve been using a lot of references and instead of having all the links and colors filling up the body of the article/post, I decided to go with a little more professional look.

I am going to break this up into different posts for different Titled jumps, even though they are all basically the same.

Today will be

How To: Include a Return to Top of Page “Page Jump”.

I’ll be honest with you. If you can do this, You can do any of the other Page Jumps I will discuss later in the series. But I’m not going to clutter up things with too many things at once.

You need two pieces of HTML Script/Code to do the Return to Top Page Jump. I gave them at the top but don’t worry they appear several times in the article. You saw how simple they are.

Bur first there are things to remember about HTML:

  • Always use HTML in the Text Tab of your Post Editor. It will not work in the Visual Tab.
  • When going through this article, all Red Bold Text is what is to be left alone. Blue Plain Text within the HTML Code is what you can change to meet what your need.
  • Save often if doing a lot of HTML Code.
  • Always open an HTML Code intensive post in the Text Tab. 

The following is how the Codes appear in a generic form, before you do what you want to them. I will also call the codes by these two Titles throughout this series but without the word Generic.


Generic Anchor code:

<a id=”unique-identifier“>words for reader to see</a>

Generic Go To code:

<a href=”#unique-identifier“>words for reader to see and click</a>


For Return to Top of Page, the Codes will end up like this.

Anchor code:

<a id=”Top“></a>

Go To code:

<a href=”#Top“>Return to Top</a>


Let’s talk Anchor Code a moment. You can now copy and paste the Anchor Code to the top of your post before everything else, even with the colors. Remember  no one will see the colors or anything else. The only way anyone can see the Anchor Code is if you put in something between the ><. And even then they don’t see the actual code itself.

Place the Go To code anywhere you need to in your post. For the Go To code, the only thing people will see is Return to Top. Why? because those words appear between the >< in the Go To code.

You can now do the Return to Top jump in your post.


If you keep reading, I explain about how the two scripts work and what makes parts of them important. If you are simply going to use them as is and you think any further explanation might confuse you then stop now. Just make sure to scroll down to connect with me at various places like Twitter and Facebook.

But if you stay, those two pieces of code will appear again at the end, so you won’t have to scroll back up to get them or worry about copying and pasting right now.


You are still with me. Here is the Generic Anchor (GA) code and the new Top Anchor (TA) code, see how the Anchor code changed?

GA <a id=”unique-identifier“>words for reader to see</a>

TA <a id=”Top“></a>

The unique-identifier was changed to Top. That’s the word I am using to let the Go To code know where to go to. 

The words for reader to see was deleted. I personally don’t want anyone to see something at the top of my article that isn’t part of my article. You can have the word Top in there if you want people to know that’s where the Top is they are going to. The code would look like this

<a id=”Top“>Top</a>

In the Article the Reader would see the word Top in the article.

If I made the code look like this <a id=”Top“>Banana</a> the Reader would see the word Banana in the article.

But to make this work, the important part is that unique-identifier, what is now showing as Top. Now we need the Go To code and something for the Reader to Click so they can Go To the Top.

You have  the Anchor <a id=”Top“></a>
Now here is the Go To <a href=”#Top“>Return to Top</a>

Notice how the word Top appears after the = sign in both of the codes? The words are identical to each other. That is important. The script is case sensitive. Leave that # in the Go To code.

With those two scripts above you can now have some fun. You can put that Anchor at the top of your page, or anywhere in the page for that matter, and then paste that Go To script anywhere you like and as many times as you like.

That’s it for today.

If you want more detail today, and I mean MORE detail, click here. Otherwise I’ll have another article soon with more Page Jump tips. In the meantime,

Let’s connect. and then if you have a How To suggestion click here for the Contact Form.

https://twitter.com/RonovanWrites

https://www.facebook.com/pages/Ronovan-Writes/630347477034132

https://plus.google.com/u/0/+RonovanWrites/about

ronovan-profile-bw


Enter your email address to subscribe to this blog and receive notifications of new posts by email.


You decided you wanted a little more. Okay. Well, it’s a lot more now that I’ve typed it up.

Anchor Code: <a id=”unique-identifier“>words for reader to see</a>

Go To Code: <a href=”#unique-identifier“>words for reader to see and click</a>

You can do all the Page Jumps you want with these two pieces of code. I’ll have posts coming up that breaks them out more but if you want to play a little here’s all you need to do.

See that unique-identifier?

As long as you have that Identical in both codes, you can put them anywhere in your post. You want someone to have the option of skipping down to here, like I did earlier? This is all you do.

Anchor Code: <a id=”here“></a>

Go To Code: <a href=”#here“>here</a>

The id is what is known as a Header. So the id/Header for the page jump to this section equals “here“. So my header is the word here. That lets the Go To Code know what Header word to Reference when looking for where to Go To. See what I did with the red bold letters? href, and what does the Go To Code include? href.


Review for a moment and catch your breath. All of that we just talked about means, the words unique-identifier must be identical in both codes to talk to each other. If they don’t, they won’t work. That’s all we said.


Now to walk through what each part of the Anchor code means. Like I said earlier, I’m not using techie words here. At least not intentionally. If you think is too much, bail now before I confuse you.

<a id=”here“></a>

Each character in the code means something. I may not give you the technical jargon, but I will give you the gist of it all.

  • <a (Tells the blog this HTML script is going to create a link up with another script on the page or another page. That’s what <a means, a link. Just like <p means paragraph.)
  • id=”here(This is identifying your Header. Your unique place for the Go To Code to unite with. The word you type where it says here is what the Go To Script is going to look for. It’s case sensitive and needs to be exact in both HTML Codes.)
  • >< (Anything between these two will appear to the Reader of the article/post.)
  • /a> (This closes the script. If you don’t have the / in there,  there might be additional words affected. I found that out with another type of script.)

Let’s walk through what each part of the Go To code means. Or at least what it means to us.

<a href=”#here“>here</a>

  • <a (Tells the blog this HTML script is going to create a link up with another script on the page or another page. That’s what <a means, a link. Just like <p means paragraph.)
  • href=“#here (This is telling the blog the HTML script is looking for a Header Reference that is equal to a specific word. When you created the Anchor with the Anchor Code you created a Header. Now when a Reader clicks the Go To words your URL will change slightly. For example, when you clicked the word here in order to come down to this part of the page the URL now ends with #here. Notice in the following how it appears when References is used as the Anchor. https://ronovanwrites.wordpress.com/2015/04/11/japan-manga-comics/#Tezuka6-8)
  • Now this is the cool part. You can put that link, that URL since it has that Header in it, with that #, in your Go To code where it says here, and now Jump To that spot in that page. Because that URL is an Anchor on that other page.) But what would that Go To code look like? <a href=”#https://ronovanwrites.wordpress.com/2015/04/11/japan-manga-comics/#Tezuka6-8“>here</a>
  • >< (Anything between these two will appear to the Reader of the article/post. This could say here, or Return to Top, or Banana. As long as there is one something in there for the Reader to click, they can Page Jump.)
  • /a> (This closes the script. If you don’t have the / in there, then there might be additional words affected. I found that out with another type of script.)

Now you can see with just these two codes you can do a lot.

Anchor Code: <a id=”unique-identifier“></a>

Go To Code: <a href=”#unique-identifier“>word for readers to see and click</a>

Return to Top


© Copyright-All rights reserved by ronovanwrites.wordpress.com 2015


My Top Five Ways to NOT Gain Twitter Followers

Part of blogging is networking and part of networking is social networking.

GET BACK HERE!!!

I know, I said the word, networking. Anyone else have the full body shiver? But we’ll talk about one particular social networking platform today that really can apply to pretty much all of those dreaded diseases, well some of you call them that. Parasites. Life suckers. Time travelers. Well you call them that because somehow you sit down and suddenly you are two hours into the future.

But I have a solution for you.

blogging

My Top Five Ways to NOT Gain Twitter Followers

Yes—Twitter. What can Twitter do for you in regards to your blog? By connecting with other bloggers who then ReTweet or RT your Tweets other people then find you. Also if you Hashtag things properly you will get your blog noticed. But I’m not here to talk about those things. Those things just bring even more attention to your blog and cause you to have more people to read Comments from and watch click Like.

No, I want to tell you how NOT to get people to follow you on Twitter. I want to save you from those pains of progress.

It was difficult to decide the order because all are pretty close.

Number Five

Force account verification before letting someone Follow you.

So I see you, maybe you even Followed me and I am like, okay, I’ll bite. No, I’m not an Animal Animal Animal. Whoa, anyone else hear Maroon 5 for a moment there? Um, the verification thing, right. That’s when I get the message pop up that you require me to verify I am a human before I can Follow you, even if you have Followed me in the first place. That is an excellent way NOT to get a Follower. Tell me you think I am not Human. I love it. It makes my day. Please, sir, may I have another?

The great part of this is, a little thing is on your account, an image that lets us know you require verification. Even though it’s easy to do the verification process, it’s still a process and I ain’t doing a process. So if you don’t want me to Follow you, set that up and I’ll move along.

Number Four

Don’t put information in your Bio section.

Mystery. Ah yes. We all love them—in books, in movies. You should keep yourself a mystery by not telling anyone about who you are or what you are interested in or what you might be Tweeting about. That’s a way to make people keep moving on. If you Follow me and I go check you out, as I do everyone who Follows me, and I don’t see something that lets me know something about you, that you are a for real person, then enjoy my Tweets but I won’t be enjoying your advertising of whatever you are tweeting for someone about. Oh no. I just mentioned wanting to confirm you are human! Oops.

Really, I want to know you’re not a dummy account of something I will tell you about later. OOOOO cliff hanger.

Number Three

Keep the nice Egg photo as your image.

Twitter is the second coming of Easter at times. All those new eggs out there that have been around for a few years kind of smell after a time. I see egg I think, “What? Not even a cat photo?” I’ll go check them out but it’s rare I find a reason to Follow Back. So if you don’t want Followers keep the Egg and don’t use an approachable photo. Dom photos seem to scare me and others away as well. Doms and Eggs. Both have four letters. Interesting. Maybe four letter words keep me from Following. Hmm.

Number Two

Use a bunch of random letters as your handle.

I love not being able to pronounce a name or Twitter Handle. HZZxccSxCzzh might be a great person but I’ll never knooowwww. Bunches of messed up letters just screams to me, “No, do not look at me. I am not here. You can’t see me. I’m a ninja.” That’s right. I can’t see you. I am like, “What? Not even CatLover013?”

Number One

Put up Buy Twitter Followers as your header photo and/or Bio information.

I love how many people are part of the SPEED UP YOUR TWITTER MARKETING CAMPAIGN club. You can tell who they are because of that pretty blue header photo that tells you how much it costs to buy Followers. The blue brings out the color in my eyes. I’m not a club joiner and not into buying Followers. That doesn’t serve a purpose to me. But go ahead and join it and you won’t have to worry about me Following you. It just says to me, “I was told that this is a great way to get people to follow me and I fell for it and I have like no one really following me and I don’t really have anything to say but if I put up blue people will come and look at it and if they do it long enough they will learn the secret lottery winning numbers.” (Yes, this is how my mind just sort of flows sometimes. Scary, huh? Don’t you wish you were me?)


And a Bonus of How to Get me to UnFollow you fast.

I mentioned earlier how I want to know people aren’t dummy accounts so I look to see if they have bios or tweet things. Well, there is a reason I look for that. One reason is because often times as soon as I do follow someone that is like a total mystery they send me a Direct Message telling me how much I can pay them to Follow me with their 18,000 Twitter accounts. Do that and you have lost my Follow.

Well, I hope you enjoyed the advice and that you lose a lot of potential Followers. I love to help, as you all know. Live long, prosper, and Hermit like Kermit in the swamp.


Ronovan

Ronovan Writes


Remember to follow me:

@RonovanWrites
Facebook
GoodReads
Google+

Enter your email address to subscribe to this blog and receive notifications of new posts by email.

© Copyright-All rights reserved by ronovanwrites.wordpress.com 2015

How to get in a poetry groove.

Talking about how I write a poem today. I don’t mean as in line by line or how to rhyme.

I was having a conversation with Florence from LitWorldInterviews about my poem ‘Caught in the Deed’ and how the last line totally twisted the entire meaning of the poem and how I was getting some nice feedback for it. That has been a nice thing to have. If anyone who writes say they don’t care about feedback and compliments, I would question that a bit. And I say that simply for the fact that for the things I write there is often a lot of, and I mean  a lot of emotion behind it so feelings evoke feelings and it’s nice to hear that those feelings came across. Of course I mean that in regards to other poems, not necessarily ‘Caught in the Deed’.

The truth of the matter is I had no idea what that last line was going to be. She asked what was the other possibilities, and I honestly said there were none. I seriously just had a thought of “I’m sneaking out to get something to fill my needs and I don’t want anyone to catch me.”

This turned into a conversation about how we both write. I am a go for it type. Some play it safe. Let me explain why I can be a go for it writer.

I can delete anything I write and not share it.

Interesting concept, eh?

One of my more popular poems is “Would you . . .” When I first started writing that day I was writing one of my more typical lame poems and I just was not feeling it, and I should not have been feeling it. So I hit enter a few times to space down to a clean area, closed my eyes, paused for a few moments to get that lame garbage out and just center on the first emotion that came to me, and then began to type.

I’ve told people before to just type with their eyes closed and don’t stop. When I say that I literally mean don’t stop for typos or anything. You are going to type words you never use and sentence structure that is completely outside of your normal style. One sentence may not make any sense in the stream of things but keep going. Nothing is wrong at this point, nothing is off limits.

Once you have exhausted it all, open your eyes and take a look.

Other than typos there  are few things I change. I might change the length of a line because it ruins the flow of the poem, or I will change a word that is just a glaring horror to the rest of the poem.

What you accomplish when you use the no eyes technique is you rid yourself of all those outside visual distractions and you tap into inner images and emotions.

Another example of letting the worlds flow is the lyric poem “Look what you’ve done to me, oh oh”. To tap into a more primal/sensual feeling I had to close my eyes and just climb inside of my thoughts. For that one I had to ‘see’ what I was writing, but in order to ‘see’ I had to close my eyes to my humdrum surroundings and picture inspiration for those words.

Eventually you will be able to write without closing your eyes. I don’t. I actually play my laptop keys like a piano when writing at times. I even actually move my hands that way and groove to the feel. I know a real poem is happening if that is how I am writing.

Am I a professional or expert at poetry? Far from it, but I do enjoy it a great deal and use it to get a lot of feelings out that I need to get out. “Writing for Therapy’ is one of my things I say repeatedly. I guess if you look at those poems mentioned you’ll get a glimpse into what I need help with. Also, don’t look at my poetry as what poetry is suppose to be like, because as I said, I am not an expert. I am just a hack who has to get it out.


Much Respect

Ronovan

followmeonbloglovin


2014 © Copyright-All rights reserved by ronovanwrites.wordpress.com

Monday Rambles – Beat the Emotional Funk with I.W.R

I had this planned all week to share as soon as I saw it. I really liked this article and since this is Female Focus Friday on RonovanWrites, as it is every Friday. Here you go.

The Showcase

So its time for my Monday rambles..I missed rambling monday last week not because I did’nt have anything to write about, but more because I was in what you’d  call an ‘Emotional Funk’.

Well, you know times when you just feel disconnected and listless and when nothing excites and motivates you to get out of your Pajamas and you end up looking like a mop. I used to think of it as a spell of ‘Chronic Laziness’ but now I understand its just a phase where you lose your ‘Passion’ for that Special V.V.I.P – You! 

I decided I had to beat the ‘E. F’ with the ‘I.W.R’ and fall in love with myself once more..

I for IDENTIFY The first step to solving virtually every problem on the planet and specially in this particular situation is to – IDENTIFY that you are in an emotional funk and not always…

View original post 218 more words

How To Write A Haiku Poem In English Form

All links open in a new window unless noted as ‘you will leave this page‘.


There are various Japanese Forms of poetry based on syllable structure (see Haiku, Tanka, and Haibun. It’s all poetry to me. Learn the difference.), much like many nations and cultures of the world (see How to Write an Espinela or Décima Poem). The Japanese Haiku poem is probably the most challenging due to its low syllable constraints. (5/7/5 or 3/5/3 or 2/3/2) If you really want to be challenged, try a 1/2/1. I don’t think this is really a Haiku form, but I wouldn’t be surprised if it was. Examples further down the page.

This post discusses How to write a Haiku Poem in English Form. Haiku purists in the Japanese style attempt to write a Haiku that can be read in one breath. This means it’s minimal in word choice while vivid with imagery and short at the same time. The more you write, the easier it becomes to exclude words such as the, is, and there, etc. from your thoughts while thinking of your poems and count syllables in your head in the middle of a drive to work or store. I find myself tapping with my fingers counting syllables in the strangest locations.

Six things to remember about Traditional Haiku form:

  • You have three lines of poetry.
  • 17 total syllables, some say sounds, in the 5/7/5 pattern. (The syllables of words may vary due to the country’s English you speak.)
  • You normally tell two opposing images in the poem.
  • Lines one and two should read as a complete sentence and lines two and three should read as a complete sentence. Easier than it sounds.
  • Haiku do not have titles/names.
  • You normally use mostly descriptive words and as few filler words as possible, such as the, and, there, is, etc. Note lower in the post my example 3/5/3 version of the 5/7/5 Haiku I provide as an example. You get the same message with each version.

Notice the word normally. You can have the poem be about aspects of the same thing, but normally you look at it from two different ways.

Artistic and traditional elements include kigo or words that are related to seasons: (Learn more about kigo here, a different website. The following through Kigo List T-Z are from the same site.)

  • Nature
  • Colors
  • Seasons

Kigo list A-J
Kigo List K-S
Kigo List T-Z

Noted on the site that not all words are Kigo. “Some are haiku TOPICS (keywords) to be used during the whole year.” There are several helpful links in the site’s sidebar.

You use these elements:

  • to give a visual of whatever you are attempting to relay
  • and usually include the season you write it in

Remember you can use 3/5/3 or 2/3/2 syllable structures as well as many others, but the three below are plenty to start with.

Three examples of the same haiku using the different syllable structures.

5/7/5 Example

The tree is falling,

Down among the river rocks,

Fish bring forth new life.

Lines one and two read as: The tree is falling down among the river rocks.

Lines two and three read as: Down among the river rocks, fish bring forth new life.

  1. The tree is falling and dying among the rocks of the river
  2. And fish are living and bring life among the rocks of the river
  3. Two opposite things happening.
  • Note the capitalization and punctuation in the haiku. It is important to use those wisely to convey your intended message.

3/5/3 Example

tree falling

among river rocks

fish new life


2/3/2 Example

tree falls

mid stream’s rock

new life


1/2/1 Example

tree

feeds water

life

Strangely enough, I like the 2/3/2 version the best and this is the first time I’ve tried one. This is an update on September 12, 2020. The original post is from July 02, 2014. As you can see, over six years and my first try.


Opposites are not a MUST, but are the true way of Haiku and add to the challenge. And you don’t want to reveal to much in the haiku so the reader is able to make an interpretation. Do not let that prevent you from writing. The more you write the closer you get to achieving true Haiku.

Matsuo Bashō Statue Haiku

As Matsuo Bashō put it,

“The haiku that reveals seventy to

eighty percent of its subject is good.

Those that reveal fifty to sixty percent,

we never tire of.”


My original Haiku reveals 100%.

 The tree is falling,

Down among the river rocks,

Fish bring forth new life.


Can I take the Haiku and make it fifty to sixty percent? 

Life splinters apart,

Down among slippery mounds,

Life brings forth new life.

In this new version, the same thing is said but also leaves some interpretation to the reader, which in a way I like to do for the reader. Give the reader something they can connect within their own way. It is easy to slip away from writing haiku this way as you begin to play around with different themes.

That is the basic way I usually like to write Haiku but often veer off into another message. It is fun, challenging, and an artform. I am not saying I am an artist, but I do believe those who can do it well, are. I am still a finger painter in this world, but I enjoy staining my skin in the ink.

To get to the point where you can consistently write like a true Haiku artist it could take years, but writing is the purpose and eventually, you get there, if that’s where you want to go. Otherwise, enjoy the way you want to write and the message you wish.


Below should be all you need to help with Haiku: Sure there are plenty of sites you’ll discover, some thatt even write the haiku for you, but why?

  • The best syllable counter is the dictionary. Others I’ve used will give different counts to the same word or the same Haiku. Stick to the dictionary. I’m deleting the syllable counter link from my poetry challenge with my next challenge, 10/12/2020. https://www.merriam-webster.com/
  • For synonyms, thesaurus.com. It also provides antonyms and the drop box where you enter your word also includes DEFINITIONS as an option.
  • The Kigo Lists

For other types of Haiku click and read-Haiku, Tanka, and Haibun. It’s all poetry to me. Learn the difference.

To learn Freku, which I came up with, click and read – NEW FORM of Haiku & Poetry.

To learn the Shi Rensa or Four Chain haiku, click and read – Four Chain | Shi Rensa Haiku.

For examples of my own Haiku offerings click here and you will leave this page.

For a list of the weekly Haiku Poetry Prompt Challenges and the current challenge post I host, click here and you will leave this page.

Much Respect

Ronovan

Originally posted July 02, 2014.


Enter your email address to subscribe to this blog and receive notifications of new posts by email.

Copyright-All rights reserved-RonovanWrites.com 2020.

How I wrote a Poem or How it wrote me.

How I wrote a Poem

by: Ronovan


Poetry comes from anywhere and everywhere. Not very helpful sounding is it? Let’s say you are eating cereal one morning at the breakfast table and you hear a clink in the kitchen of glasses. The sound triggers a memory, you are drawn back into childhood. A feeling comes over you of the spoon growing larger as you shrink back into childhood and become seven years old again.


Cold milk with floating OsWigged man reading poem

Clinking glasses in the sink

Shrinking tiny fingers

Pulling mind back to think

Oh those yesteryears

So simple way back when

They bring a smile to my face

Every now and then


Admittedly that’s not my best work, but as quickly as I am writing this piece today I am creating it without stopping and just letting the thoughts flow. I did not have an idea for the cereal or anything when I started typing this article. I might would go back and tweak this a bit to be better but for now I wanted you to see what can inspire a poem. And words don’t have to be beautiful stand alone words, or rhyme. By that I mean these poetically sounding words. They can just be ordinary words, which are what most of my work is.


Ordinary words touch everyone. You can understand one of my pieces instantly. That’s not to say mine are better than another persons, I just want you to know that just because you don’t think with those words doesn’t mean you cannot write poetry. You can write a poem in everyday words, and then look up synonyms and have fun with it.


Now I want to go into a recent poem I wrote and how it came about to show you the process. I dislike calling it a process because I really don’t have one. I think instead I will call it the creation of the poem. Even in my writing of this article I just let the words flow and go with it. Instead of correcting the use of ‘process’ I explained it and then created a new way of expressing my work. This is how poetry works as well.


The poem is Truth in a Picture. I needed a pick me up piece to do. I wanted to write something happy and full of life. For this I usually go to photos, sometimes of friends online but sometimes just wandering about the web. I wandered. I looked up some art paintings and happy did not happy.


This painting did.

gettyimages © Original Photo by nikkivanoostende.com


The colors caught my eye, then sadness. There’s no doubt the woman is beautiful, but then you see more.


After the glimpse of color I saw the eyes and how they looked vacant and broken. It reminded me of pictures I have seen of female friends where the smile doesn’t reach the eyes.


That’s when the poem began, or perhaps it began as soon as I saw the eyes.


Thoughts came to me of what if I were the woman and knew what a man was thinking as he saw me looking beautiful but inside I didn’t even care because I knew the truth.


What if I knew why I looked the way I did? What if I knew this was my mask, my disguise?


Happy didn’t happen.


I’m not a long form poem writer very often, not that this is a long poem at all. I usually get my thoughts out as efficiently as they come to me. I looked at the painting and then closed my eyes and typed. I remembered the eyes, the nose and the lips. I thought of how makeup and lipstick are paints of disguise. I thought of how the paint attracts attention to disguise the harm caused by attention. I imagined her thoughts at each of his thoughts.


I then thought of the flip side of that and what the woman was underneath the pain and what the paint covered up. I altered the picture to show what was underneath.

Featured Image -- 2260

Sleep circles and bruises. The colorlessness a woman feels . . . the lifelessness. I took each of the previous thoughts and made them the truth from her side.


The reaction to the poem has been encouraging in the honesty of it. I was asked how do I know what women think. My replies never really captured my thoughts. I don’t know that I do know what women think, I just know how I feel about something and then I put it into words. Somehow in this piece I contained an anger until after I was finished. The anger would have turned it into a much different piece. I’m not sure I could have written that piece.


I tend to tell a story in my poems, be it my autobiography or some societal thing that plagues my mind. I do try to have fun with it at times, but that is rare. Write what comes out of your fingertips. Let your mind take over, let your heart set the tempo, and get out of the way.


Much Respect

Ronovan

 Copyright-All rights reserved-©RonovanWrites.wordpress.com-June 30, 2014.

How, What, and Why To Create a Twitter List

Creating a Twitter List

by: Ronovan


This is going to sound strange to start off talking about making Twitter Lists before some of you even have Twitter but believe me this is when you want to know. Otherwise you will end up putting out a blog article asking people to let you know if they have Twitter so you can put them in a group AFTER you already have hundreds or thousands of people to sort through.


By starting now, early on, you can put them in a group as you add them. In other words . . . you’ll do it the easy way.

Creating a Twitter account itself is simple in that all you need is your name, email, and a password. The signup process walks you through the steps.


Today I want to talk about the Twitter Lists options.Twitty Bird

First up: Why?

You want to add your Followers or the people you Follow to certain lists based on what they are to you.

Examples:

Friends

Bloggers

WordPress Bloggers

Agents

Publishers

Photographers

Just Cool People

Good for RT Info


You can see there are various things you can come up with. Basically whatever helps you to remember. Also each time you create a List you get to add a description just in case you forget the reason for the group.


Second: What?

Once you have a List what do you do with it?

This is what I do with it so for any Twitxperts out there bear with me, I know you have your ideas.

  • I use my WP Bloggers list to find my WP Blog Friends and ReTweet (RT) any of their things that look cool to me, even just basic Tweets. People love personal funny sometimes over information article Tweets. It gives people a bond to you.
  • I use it to keep tabs on Literary Agents/Publishers to see if they have anything going on like a Tweet Pitch of your Manuscript (MS) coming up. Sometimes they will say for these two hours Tweet a Pitch of your MS. You have the 140 characters to use, part of which is the lit handle name. Go ahead and work on a pitch so you are ready now.
  • I use it to keep track of my Friends from school or home.
  • And I use it to actually see WordPress blogs that come out. With so many people I follow, the Reader in WordPress can be difficult, but on Twitter I can easily see who has put one out recently, if they have Twitter attached to their blogs.
  • And you can put those Companies that Follow you in a List along with those who want you to pay for Followers. Just so you have those annoying people out of the way.


Third: How?

So how do you set up a list and how do you actually use them? First off there will be those who tell you about TweetDeck. TweetDeck will allow you to set up all sorts of things, but for me, I like just clicking on a List and seeing what I see. I may go into TweetDeck in another article, but for now I will stick just with what Twitter itself does. Just give me the basics. I like basics.


Step #1

You are logged into Twitter and now you see in the top right corner, as of the writing of this article anyway, a little round Gear shaped icon. This is the ‘Settings and help’ icon. Click this and you will see a drop down box open, click ‘Lists’.

Lists


Step #2

You are now on the Lists screen and you should see on the right a box that says ‘Create new list’, click it.

CNL


Step #3

A box should now be on your screen with a ‘List name’ field/box and a ‘Description’ field/box. Type in the name of your List. You can also fill out the ‘Description’ if you like. I don’t always do that part. Once you have done this part you will choose if you want others to be able to see your List or not. So you choose ‘Public’ or ‘Private’ under the ‘Privacy’ section in the box. In all honesty I don’t want people to see my WordPress Friends list because I don’t want them using it to spam them for followers or with Tweets/messages about products.

CANL

Finally click ‘Save List’ at the bottom of the box.


Step #4

You want to add your Followers or those you Follow to a List.

Add To Twitter List

  • Go to a person and click the ‘Gear’ on their page. You will see ‘Add or remove from lists’.
  • A ‘Your Lists’ box will appear and you will just check which list(s) you want them to be in.
  • Then click the ‘x’ to close the box.


Step #5

To use your Lists just go to your ‘Gear’ and click ‘Lists’, just as you did in Step #1. Not only do you create Lists here but you also can see all of the ones you have made and the number of people in each one.

Then click the List you want to see. You could just stay on this list the entire time you are on Twitter for the day and only see Tweets from those people.

Maybe one day you just want ‘Inspirational’ Tweets because you need a pick me up. Make an ‘Inspirational’ List.

And remember, people can be in more than one List. I have a WordPress Friends list that everyone that follows me and has a WordPress blog, or that I follow for that matter and has a WordPress blog is in.  But some of those may fit into other areas. I may put some into a list like ‘Great for Editing Information’ or ‘Photography’.

You may be thinking “Why the bother, why not just look at all the Tweets?” You will want to support people on Twitter by following them, but you may not like their Tweets. You could just have a ‘Yes’ List and a ‘No’ List. One to view and one not to. That simple. And you can change the person from one to the other any time you like.


Copyright-All rights reserved-©RonovanWrites.wordpress.com-June 27, 2014.

Reblogging: The How and Why

If I Reblog someone then THEIR blog article will be looked at instead of mine.

I guess some look at blogging as a competitive thing. Personally, I blog to write and enjoy the company.

First, if you are new to blogging or looking in to blogging as something you want to do, you may want to know what Reblogging is.

Reblogging is when you read the post someone has written and you enjoy it to the point you want to share it with your own readers. If there is a button on the screen that says Reblog then you can click that button and normally type a message in a field that pops up. Then you click enter or send and part or all of the post will appear on your blog with your message at the top to introduce the post to your readers. Some Bloggers even Reblog their own Posts.

Why are the reasons you would ReBlog a Post?

  • You really like an article.
  • An article inspires you.
  • The article is informative for your friends.
  • A friend is on vacation and you want their blog and name to continue to be seen in the community.
  • You want to help a new blogger by sharing their wonderful work with my friends.

Always do an honest Reblog. If you don’t like it, don’t do it.

Now for how to Reblog properly.

What, I don’t just click Reblog?

You can, but if you really want to do it right you need to take another step.

This is what I do when I see a blog article and realize I am going to Reblog.

Step 1

I go ahead and pull up my Posts page in the Dashboard.

Step 2

I click Reblog on the other person’s post and type in something appropriate as to why I am Reblogging the article.

Step 3

After I have Reblogged, I refresh my Post Page in the Dashboard section and there is the Reblogged Post.

Step 4

I copy and paste the Tags from the original bloggers page into the Tags on the Reblogged post, click Add, and then click Update.

Why do I do this?

Sure, by Reblogging some of my Friends that are not the other persons Friends will see it but with the Tags included the article will be in the WordPress Reader for people a second time and maybe draw attention.

In all honesty, in the marketing world, sometimes it takes a person seeing something 19 times before they will take true notice of it or do something about it. No, I’m not going to Reblog a post 19 times. But if you see an article you like Reblog it. Maybe other people will do the same and that’s a few more times it gets passed around and those search engines can find them.

This doesn’t take but a minute of your time, and if you truly enjoy something, then do it. You do two things with your blog;1) You have fun with it, and 2) You provide your Friends with the best and most relevant thing for them you can. Sometimes that best is something from someone else.

That’s all for this Blog Tip.

For  a related article  click here to go to Blog Tip: Links to Blogs and Articles-How To and Why. You will leave this page by clicking the link that is embedded in the word here in the previous sentence.

Much Respect to my Friends and to those passing by.

@RonovanWrites


Enter your email address to subscribe to this blog and receive notifications of new posts by email.

© Copyright-All rights reserved-RonovanWrites©.wordpress.com-June 25, 2014.